Introduzione all'Interfaccia a Riga di Comando
Come Node Operator, la CLI è il tuo strumento principale per interagire con Rocket Pool.
La userai per creare nuovi minipool, controllare lo stato di tutto, richiedere ricompense RPL periodiche, uscire e prelevare dai tuoi minipool quando sei pronto, e una serie di altre attività.
Una volta terminata la sincronizzazione delle catene Execution e Beacon, tutti i comandi saranno disponibili per l'uso.
In questa sezione, faremo un breve tour di alcuni dei più comuni e di altri trucchi che la CLI può fare.
Conoscere i Comandi
Per elencare tutti i comandi disponibili, digita:
L'output sarà simile a questo:
______           _        _    ______           _
| ___ \         | |      | |   | ___ \         | |
| |_/ /___   ___| | _____| |_  | |_/ /__   ___ | |
|    // _ \ / __| |/ / _ \ __| |  __/ _ \ / _ \| |
| |\ \ (_) | (__|   <  __/ |_  | | | (_) | (_) | |
\_| \_\___/ \___|_|\_\___|\__| \_|  \___/ \___/|_|

Authored by the Rocket Pool Core Team
A special thanks to the Rocket Pool community for all their contributions.

NAME:
   rocketpool - Rocket Pool CLI

USAGE:
   rocketpoolcli [global options] command [command options] [arguments...]

VERSION:
   1.19.1

COMMANDS:
   auction, a   Manage Rocket Pool RPL auctions
   claims, l    View and claim all available rewards and credits across the node
   minipool, m  Manage the node's minipools
   megapool, g  Manage the node's megapool
   network, e   Manage Rocket Pool network parameters
   node, n      Manage the node
   odao, o      Manage the Rocket Pool oracle DAO
   pdao, p      Manage the Rocket Pool Protocol DAO
   queue, q     Manage the Rocket Pool deposit queue
   security, c  Manage the Rocket Pool security council
   service, s   Manage Rocket Pool service
   wallet, w    Manage the node wallet
   help, h      Shows a list of commands or help for one command

GLOBAL OPTIONS:
   --allow-root, -r              Allow rocketpool to be run as the root user
   --config-path path, -c path   Rocket Pool config asset path (default: "~/.rocketpool")
   --daemon-path path, -d path   Interact with a Rocket Pool service daemon at a path on the host OS, running outside of docker
   --maxFee value, -f value      The max fee (including the priority fee) you want a transaction to cost, in gwei (default: 0)
   --maxPrioFee value, -i value  The max priority fee you want a transaction to use, in gwei (default: 0)
   --gasLimit value, -l value    [DEPRECATED] Desired gas limit (default: 0)
   --nonce value                 Use this flag to explicitly specify the nonce that this transaction should use, so it can override an existing 'stuck' transaction
   --debug                       Enable debug printing of API commands
   --secure-session, -s          Some commands may print sensitive information to your terminal. Use this flag when nobody can see your screen to allow sensitive data to be printed without prompting
   --help, -h                    show help
   --version, -v                 print the version

COPYRIGHT:
   (c) 2026 Rocket Pool Pty Ltd
Comandi Service
Il gruppo service riguarda la gestione dei vari servizi che lo smart node gestisce per te.
Ecco cosa mostrerà l'output di rocketpool service help:
NAME:
   rocketpool service - Manage Rocket Pool service

USAGE:
   rocketpool service [global options] command [command options] [arguments...]

VERSION:
   1.19.1

COMMANDS:
   install, i                 Install the Rocket Pool service
   config, c                  Configure the Rocket Pool service
   status, u                  View the Rocket Pool service status
   start, s                   Start the Rocket Pool service
   pause, p                   Pause the Rocket Pool service
   stop, o                    Pause the Rocket Pool service (alias of 'rocketpool service pause')
   reset-docker, rd           Cleanup Docker resources, including stopped containers, unused images and networks. Stops and restarts Smart Node.
   prune-docker, pd           Cleanup unused Docker resources, including stopped containers, unused images, networks and volumes. Does not restart smartnode, so the running containers and the images and networks they reference will not be pruned.
   logs, l                    View the Rocket Pool service logs
   stats, a                   (DEPRECATED) No longer supported. Use 'docker stats -a' instead
   compose                    View the Rocket Pool service docker compose config
   version, v                 View the Rocket Pool service version information
   prune-eth1, n              Shuts down the main ETH1 client and prunes its database, freeing up disk space, then restarts it when it's done.
   install-update-tracker, d  Install the update tracker that provides the available system update count to the metrics dashboard
   get-config-yaml            Generate YAML that shows the current configuration schema, including all of the parameters and their descriptions
   resync-eth1                Deletes the main ETH1 client's chain data and resyncs it from scratch. Only use this as a last resort!
   resync-eth2                Deletes the ETH2 client's chain data and resyncs it from scratch. Only use this as a last resort!
   terminate, t               Deletes all of the Rocket Pool Docker containers and volumes, including your ETH1 and ETH2 chain data and your Prometheus database (if metrics are enabled). Also removes your entire `.rocketpool` configuration folder, including your wallet, password, and validator keys. Only use this if you are cleaning up the Smart Node and want to start over!

GLOBAL OPTIONS:
   --compose-file value, -f value  Optional compose files to override the standard Rocket Pool docker compose YAML files; this flag may be defined multiple times
   --help, -h                      show help
status
Questo comando mostra lo stato di esecuzione corrente di ciascuno dei container Docker gestiti da Rocket Pool.
Ad esempio, l'output dell'installazione Docker predefinita appare così:
        Name                       Command              State                                                       Ports
------------------------------------------------------------------------------------------------------------------------------------------------------------------------------
rocketpool_api          /bin/sleep infinity             Up
rocketpool_eth1         sh /setup/start-node.sh         Up      0.0.0.0:30303->30303/tcp,:::30303->30303/tcp, 0.0.0.0:30303->30303/udp,:::30303->30303/udp, 8545/tcp, 8546/tcp
rocketpool_eth2         sh /setup/start-beacon.sh       Up      0.0.0.0:9001->9001/tcp,:::9001->9001/tcp, 0.0.0.0:9001->9001/udp,:::9001->9001/udp
rocketpool_node         /go/bin/rocketpool node         Up
rocketpool_validator    sh /setup/start-validator.sh    Up
rocketpool_watchtower   /go/bin/rocketpool watchtower   Up
Puoi usarlo per controllare rapidamente se uno dei container Docker ha problemi, o per assicurarti che un comando start o stop abbia funzionato correttamente.
start e stop
Questi due comandi li conosci già.
Semplicemente avviano tutti i container Rocket Pool, o li fermano.
Tip
Il comando pause fa la stessa cosa di stop.
È rimasto come comando legacy dalle versioni precedenti di Rocket Pool.
logs
Questo è un altro comando che dovresti già aver visto.
Puoi usarlo per guardare i log di output di ogni container Docker.
Questo può essere utile per la risoluzione dei problemi o per ottenere un rapporto di stato più dettagliato da essi.
Se esegui semplicemente rocketpool service logs senza altri argomenti, aggrega tutti i log insieme e te li mostra in una volta.
Se vuoi concentrarti sull'output di un container, puoi aggiungere un argomento alla fine per specificare il container.
I valori validi sono eth1, eth2, validator, api, node, watchtower, prometheus, grafana e node-exporter.
stats
Questo comando mostra alcune statistiche sulle risorse di ciascuno dei container, che puoi usare per profilare il consumo hardware e di rete di ciascuno.
Potrebbe essere utile per monitorare i container se il tuo sistema inizia a funzionare lentamente o ha problemi di RAM.
Ecco un esempio di output:
CONTAINER ID   NAME                    CPU %     MEM USAGE / LIMIT     MEM %     NET I/O           BLOCK I/O         PIDS
62314e5a0ecf   rocketpool_api          0.00%     18.89MiB / 62.78GiB   0.03%     50.6kB / 31.1kB   57.4MB / 0B       1
ac629c08c896   rocketpool_eth1         5.44%     18.13GiB / 62.78GiB   28.88%    1.63GB / 1.66GB   24.4GB / 37.7GB   27
4dfc7a2e939b   rocketpool_eth2         97.39%    2.369GiB / 62.78GiB   3.77%     1.79GB / 45MB     333MB / 24.1GB    2
a3c22f54eff0   rocketpool_node         0.00%     12.13MiB / 62.78GiB   0.02%     308kB / 504kB     0B / 0B           15
0d5818868ef6   rocketpool_validator    0.00%     936KiB / 62.78GiB     0.00%     12.1kB / 0B       4.57MB / 0B       2
88bea525fa89   rocketpool_watchtower   0.00%     12.05MiB / 62.78GiB   0.02%     304kB / 503kB     0B / 0B           16
NOTA
La statistica RAM qui mostra la memoria totale allocata, che include la memoria virtuale.
Non mostra il consumo di memoria residente grezzo.
Allo stesso modo, l'utilizzo della CPU mostra la quantità totale di consumo della CPU mediata su tutti i core della CPU che il container utilizza.
Qui, la CPU per ETH2 mostra quasi il 100% perché sta usando Nimbus, che è single-thread.
Potresti scoprire che un programma come htop o btop offre una migliore visione del consumo effettivo delle risorse.
config
Questo comando esegue di nuovo l'intervista di configurazione.
Puoi usarlo se vuoi cambiare la tua selezione del client Execution o Consensus, o cambiare alcuni dei parametri che hai inizialmente specificato quando li hai selezionati (come il messaggio graffiti del tuo validator, il numero massimo di peer a cui connettersi, e così via).
Puoi chiamare questo comando in qualsiasi momento, ma le modifiche non avranno effetto finché non chiami rocketpool service stop e rocketpool service start.
terminate
Questo comando arresterà i container Docker, quindi li eliminerà, eliminerà la rete virtuale Rocket Pool ed eliminerà i volumi dei dati delle catene ETH1 e ETH2.
Rimuove essenzialmente tutti gli elementi Rocket Pool dalla tua configurazione Docker.
Usalo quando vuoi ripulire quella parte dell'installazione di Rocket Pool.
Warning
Questo rimuoverà irreversibilmente i tuoi dati della catena, il che significa che dovrai sincronizzare di nuovo ETH1 e ETH2.
Questo non rimuoverà i tuoi file wallet e password, le tue impostazioni configurate o le tue chiavi validator.
Per rimuoverli, dovrai eliminare la cartella ~/.rocketpool/data in modalità Docker o Hybrid, o la directory corrispondente in modalità Native.
Comandi Node
Il gruppo node riguarda le operazioni sul tuo nodo Rocket Pool.
Li tratteremo più in dettaglio nella prossima sezione dove creiamo un minipool, ma potrebbe essere utile vederli tutti a colpo d'occhio.
Ecco cosa mostrerà l'output di rocketpool node help:
NAME:
   rocketpool node - Manage the node

USAGE:
   rocketpool node command [command options] [arguments...]

COMMANDS:
   status, s                                     Get the node's status
   sync, y                                       Get the sync progress of the eth1 and eth2 clients
   register, r                                   Register the node with Rocket Pool
   rewards, e                                    Get the time and your expected RPL rewards of the next checkpoint
   set-primary-withdrawal-address, w             Set the node's primary withdrawal address, which will receive all ETH rewards (and RPL if the RPL withdrawal address is not set)
   confirm-primary-withdrawal-address, f         Confirm the node's pending primary withdrawal address if it has been set back to the node's address itself
   set-rpl-withdrawal-address, srwa              Set the node's RPL withdrawal address, which will receive all RPL rewards and staked RPL withdrawals
   confirm-rpl-withdrawal-address, crwa          Confirm the node's pending rpl withdrawal address if it has been set back to the node's address itself
   allow-rpl-locking, arl                        Allow the node to lock RPL when creating governance proposals/challenges
   deny-rpl-locking, drl                         Do not allow the node to lock RPL when creating governance proposals/challenges
   set-timezone, t                               Set the node's timezone location
   swap-rpl, p                                   Swap old RPL for new RPL
   stake-rpl, k                                  Stake RPL against the node
   add-address-to-stake-rpl-whitelist, asw       Adds an address to your node's RPL staking whitelist, so it can stake RPL on behalf of your node.
   remove-address-from-stake-rpl-whitelist, rsw  Removes an address from your node's RPL staking whitelist, so it can no longer stake RPL on behalf of your node.
   claim-rewards, c                              Claim available RPL and ETH rewards for any checkpoint you haven't claimed yet
   withdraw-rpl, i                               Withdraw RPL staked against the node
   withdraw-eth, h                               Withdraw ETH staked on behalf of the node
   withdraw-credit, wc                           (Saturn) Withdraw ETH credit from the node as rETH
   deposit, d                                    Make a deposit and create a minipool
   create-vacant-minipool, cvm                   Create an empty minipool, which can be used to migrate an existing solo staking validator as part of the 0x00 to 0x01 withdrawal credentials upgrade
   send, n                                       Send ETH or tokens from the node account to an address. ENS names supported. Use 'all' as the amount to send the entire balance. <token> can be 'rpl', 'eth', 'fsrpl' (for the old RPL v1 token), 'reth', or the address of an arbitrary token you want to send (including the 0x prefix).
   set-voting-delegate, sv                       (DEPRECATED) Use `rocketpool pdao set-signalling-address` instead
   clear-voting-delegate, cv                     (DEPRECATED) Use `rocketpool pdao clear-signalling-address` instead
   initialize-fee-distributor, z                 Create the fee distributor contract for your node, so you can withdraw priority fees and MEV rewards after the merge
   distribute-fees, b                            Distribute the priority fee and MEV rewards from your fee distributor to your withdrawal address and the rETH contract (based on your node's average commission)
   join-smoothing-pool, js                       Opt your node into the Smoothing Pool
   leave-smoothing-pool, ls                      Leave the Smoothing Pool
   sign-message, sm                              Sign an arbitrary message with the node's private key
   send-message                                  Send a zero-ETH transaction to the target address (or ENS) with the provided hex-encoded message as the data payload
   claim-unclaimed-rewards, cur                  Sends any unclaimed rewards to the node's withdrawal address
   provision-express-tickets, pet                Provision the node's express tickets

OPTIONS:
   --help, -h  show help
Di seguito è riportato un riepilogo di alcuni dei comandi che tenderai a utilizzare durante la normale operazione del nodo.
status
Questo comando ti darà una visione di alto livello del tuo intero nodo a colpo d'occhio.
Include quanti ETH e RPL hai in stake, quanti minipool hai e i loro stati, il tuo rapporto di collaterale RPL e altro ancora.
Questo è un esempio di cosa mostra rocketpool node status una volta che hai il tuo nodo registrato e alcuni minipool configurati:
=== Account and Balances ===
The node 0x4d19DE4A5a1B1B36EBaB3D5c32C01061fbDE328d has a balance of 49.402553 ETH and 0.000000 RPL.
The node has 0.000000 ETH in its credit balance and 0.000000 ETH staked on its behalf. 0.000000 can be used to make new validators.
The node is registered with Rocket Pool with a timezone location of America/Los_Angeles.

=== Megapool ===
The node has a megapool deployed at 0xCf3576c5A6e5a25AC00C9adb6751924BAe1680B1.
The megapool has 9 validators.
The node has 0 express queue ticket(s).

=== Penalty Status ===
The node does not have any penalties for cheating with an invalid fee recipient.

=== Signalling on Snapshot ===
The node does not currently have a snapshot signalling address set.
To learn more about snapshot signalling, please visit https://docs.rocketpool.net/pdao/participate#setting-your-snapshot-signalling-address.
Rocket Pool has no Snapshot governance proposals being voted on.

=== Onchain Voting ===
The node doesn't have a delegate, which means it can vote directly on onchain proposals. You can have another node represent you by running `rocketpool p svd <address>`.
The node is NOT allowed to lock RPL to create governance proposals/challenges.

=== Primary Withdrawal Address ===
The node's primary withdrawal address has not been changed, so ETH rewards and minipool withdrawals will be sent to the node itself.
Consider changing this to a cold wallet address that you control using the `set-withdrawal-address` command.

=== RPL Withdrawal Address ===
The node's RPL withdrawal address has not been set. All RPL rewards will be sent to the primary withdrawal address.

=== Fee Distributor and Smoothing Pool ===
The node's fee distributor 0x84c1f488CDecb2E335c40901E3Fe58925f4cC9A7 has a balance of 0.004897 ETH.
NOTE: You are in Native Mode; you MUST ensure that your Validator Client is using this address as its fee recipient!
The node is not opted into the Smoothing Pool.
To learn more about the Smoothing Pool, please visit https://docs.rocketpool.net/upgrades/redstone/whats-new#smoothing-pool.
You have 3 minipools that would earn extra commission if you opted into the smoothing pool!
See https://rpips.rocketpool.net/RPIPs/RPIP-62 for more information about bonus commission, or run `rocketpool node join-smoothing-pool` to opt in.

=== RPL Stake ===
NOTE: The following figures take *any pending bond reductions* into account.

The node has a total stake of 20000.000000 RPL.
This is currently 3.74% of its borrowed ETH and 30.06% of its bonded ETH.
The node has 0.000000 megapool staked RPL.
The node has 20000.000000 legacy staked RPL.
The node has a total stake (legacy minipool RPL plus megapool RPL) of 20000.000000 RPL.
You have 0.000000 RPL staked on your megapool and can request to unstake up to 0.000000 RPL

=== Minipools ===
The node has a total of 3 active minipool(s):
- 3 staking
sync
Questo comando ti mostrerà lo stato di sincronizzazione corrente dei tuoi client Execution e Consensus.
Probabilmente lo userai molto quando configuri il nodo per la prima volta, quindi non ne avrai più bisogno (a meno che tu non cambi o ripristini i tuoi client).
L'output di rocketpool node sync sarà simile a questo:
Your Smartnode is currently using the Hoodi Test Network.

Your eth1 client hasn't synced enough to determine if your eth1 and eth2 clients are on the same network.
To run this safety check, try again later when eth1 has made more sync progress.

Your primary execution client is still syncing (67.12%).
You do not have a fallback execution client enabled.
Your primary consensus client is still syncing (99.94%).
You do not have a fallback consensus client enabled.
Nota che Prysm attualmente non fornisce la sua percentuale di completamento - dovrai guardare nei log eth2 se lo usi.
stake-rpl
Questo comando è quello che userai quando vuoi aggiungere più collaterale RPL al tuo nodo.
Farlo aumenterà il tuo rapporto di collaterale, il che aumenterà le tue ricompense RPL ad ogni checkpoint (più su questo in seguito).
A differenza degli altri comandi finora, questo è effettivamente interattivo perché attiverà una transazione - non è semplicemente informativo.
Ti chiederà prima quanto RPL desideri mettere in stake, con alcune opzioni predefinite per comodità o la possibilità di specificare un importo personalizzato:
NOTE: By staking RPL, you become a member of the Rocket Pool pDAO. Stay informed on governance proposals by joining the Rocket Pool Discord.

Please choose an amount of RPL to stake:
1: 5% of borrowed ETH (733.993926 RPL) for one validator?
2: 10% of borrowed ETH (1467.987852 RPL) for one validator?
3: 15% of borrowed ETH (2201.981778 RPL) for one validator?
4: Your entire RPL balance (20000.000000 RPL)?
5: A custom amount
Una volta selezionata un'opzione, ti verranno mostrate alcune informazioni sul prezzo del gas suggerito e sull'importo stimato da utilizzare, insieme a una finestra di dialogo di conferma. Se è la prima volta che metti in stake RPL sul nodo, dovrai dare l'approvazione al contratto di staking per interagire con il tuo RPL:
Before staking RPL, you must first give the staking contract approval to interact with your RPL.
This only needs to be done once for your node.
+============== Suggested Gas Prices ==============+
| Avg Wait Time |  Max Fee  |    Total Gas Cost    |
| 15 Seconds    | 4 gwei    | 0.0001 to 0.0001 ETH |
| 1 Minute      | 4 gwei    | 0.0001 to 0.0001 ETH |
| 3 Minutes     | 4 gwei    | 0.0001 to 0.0001 ETH |
| >10 Minutes   | 4 gwei    | 0.0001 to 0.0001 ETH |
+==================================================+

These prices include a maximum priority fee of 2.00 gwei.
Please enter your max fee (including the priority fee) or leave blank for the default of 4 gwei:

Using a max fee of 4.00 gwei and a priority fee of 2.00 gwei.
Do you want to let the staking contract interact with your RPL? [y/n]
y

Approving RPL for staking...
Transaction has been submitted with hash <transaction hash>.
You may follow its progress by visiting:
https://hoodi.etherscan.io/tx/<transaction hash>

Waiting for the transaction to be included in a block... you may wait here for it, or press CTRL+C to exit and return to the terminal.

Successfully approved staking access to RPL.
RPL Stake Gas Info:
+============== Suggested Gas Prices ==============+
| Avg Wait Time |  Max Fee  |    Total Gas Cost    |
| 15 Seconds    | 4 gwei    | 0.0005 to 0.0007 ETH |
| 1 Minute      | 4 gwei    | 0.0005 to 0.0007 ETH |
| 3 Minutes     | 4 gwei    | 0.0005 to 0.0007 ETH |
| >10 Minutes   | 4 gwei    | 0.0005 to 0.0007 ETH |
+==================================================+

These prices include a maximum priority fee of 2.00 gwei.
Please enter your max fee (including the priority fee) or leave blank for the default of 4 gwei:

Using a max fee of 4.00 gwei and a priority fee of 2.00 gwei.
Are you sure you want to stake 733.993925 RPL? You will not be able to unstake this RPL until you exit your validators and close your minipools, or reach 2201.981777 staked RPL (15% of bonded eth)! [y/n]
Se confermi, ti verrà mostrato l'hash della transazione e riceverai un link a Etherscan così puoi seguirne il progresso:
Staking RPL...
Transaction has been submitted with hash <transaction hash>.
You may follow its progress by visiting:
https://hoodi.etherscan.io/tx/<transaction hash>

Waiting for the transaction to be included in a block... you may wait here for it, or press CTRL+C to exit and return to the terminal.

Successfully staked 733.993925 RPL.
La maggior parte delle operazioni richiede solo una transazione, quindi la CLI aspetterà fino a quando non sarà stata inclusa in un blocco e poi uscirà. Tuttavia, stake-rpl è uno dei pochi comandi che richiede due transazioni, quindi questa finestra di dialogo apparirà due volte.
claim-rewards
Quando il tuo nodo rileva un nuovo checkpoint delle ricompense, scaricherà automaticamente il file dell'albero delle ricompense con le informazioni per quell'intervallo (se stai usando l'impostazione predefinita della modalità Download - vedi sotto per informazioni sulla generazione dei tuoi alberi invece di scaricarli).
Puoi quindi rivedere le tue ricompense usando il seguente comando:
rocketpool node claim-rewards
Man mano che passano gli intervalli e accumuli ricompense, l'output sarà simile a questo:
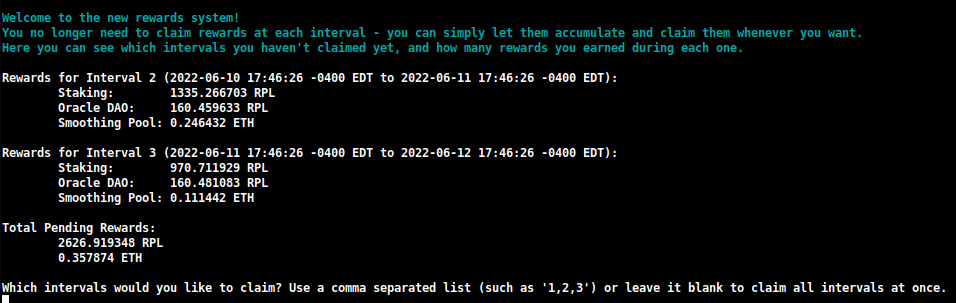
Qui puoi vedere rapidamente quante ricompense hai guadagnato ad ogni intervallo e puoi decidere quali vuoi richiedere.
Puoi anche specificare un importo che vuoi rimettere in stake durante questa richiesta:

Questo ti permetterà di comporre le tue ricompense RPL in una transazione, usando sostanzialmente meno gas di quanto attualmente necessario con il sistema di richiesta legacy.
NOTA
Se preferisci costruire il checkpoint delle ricompense manualmente invece di scaricare quello creato dall'Oracle DAO, puoi cambiare questa impostazione da Download a Generate nel TUI:
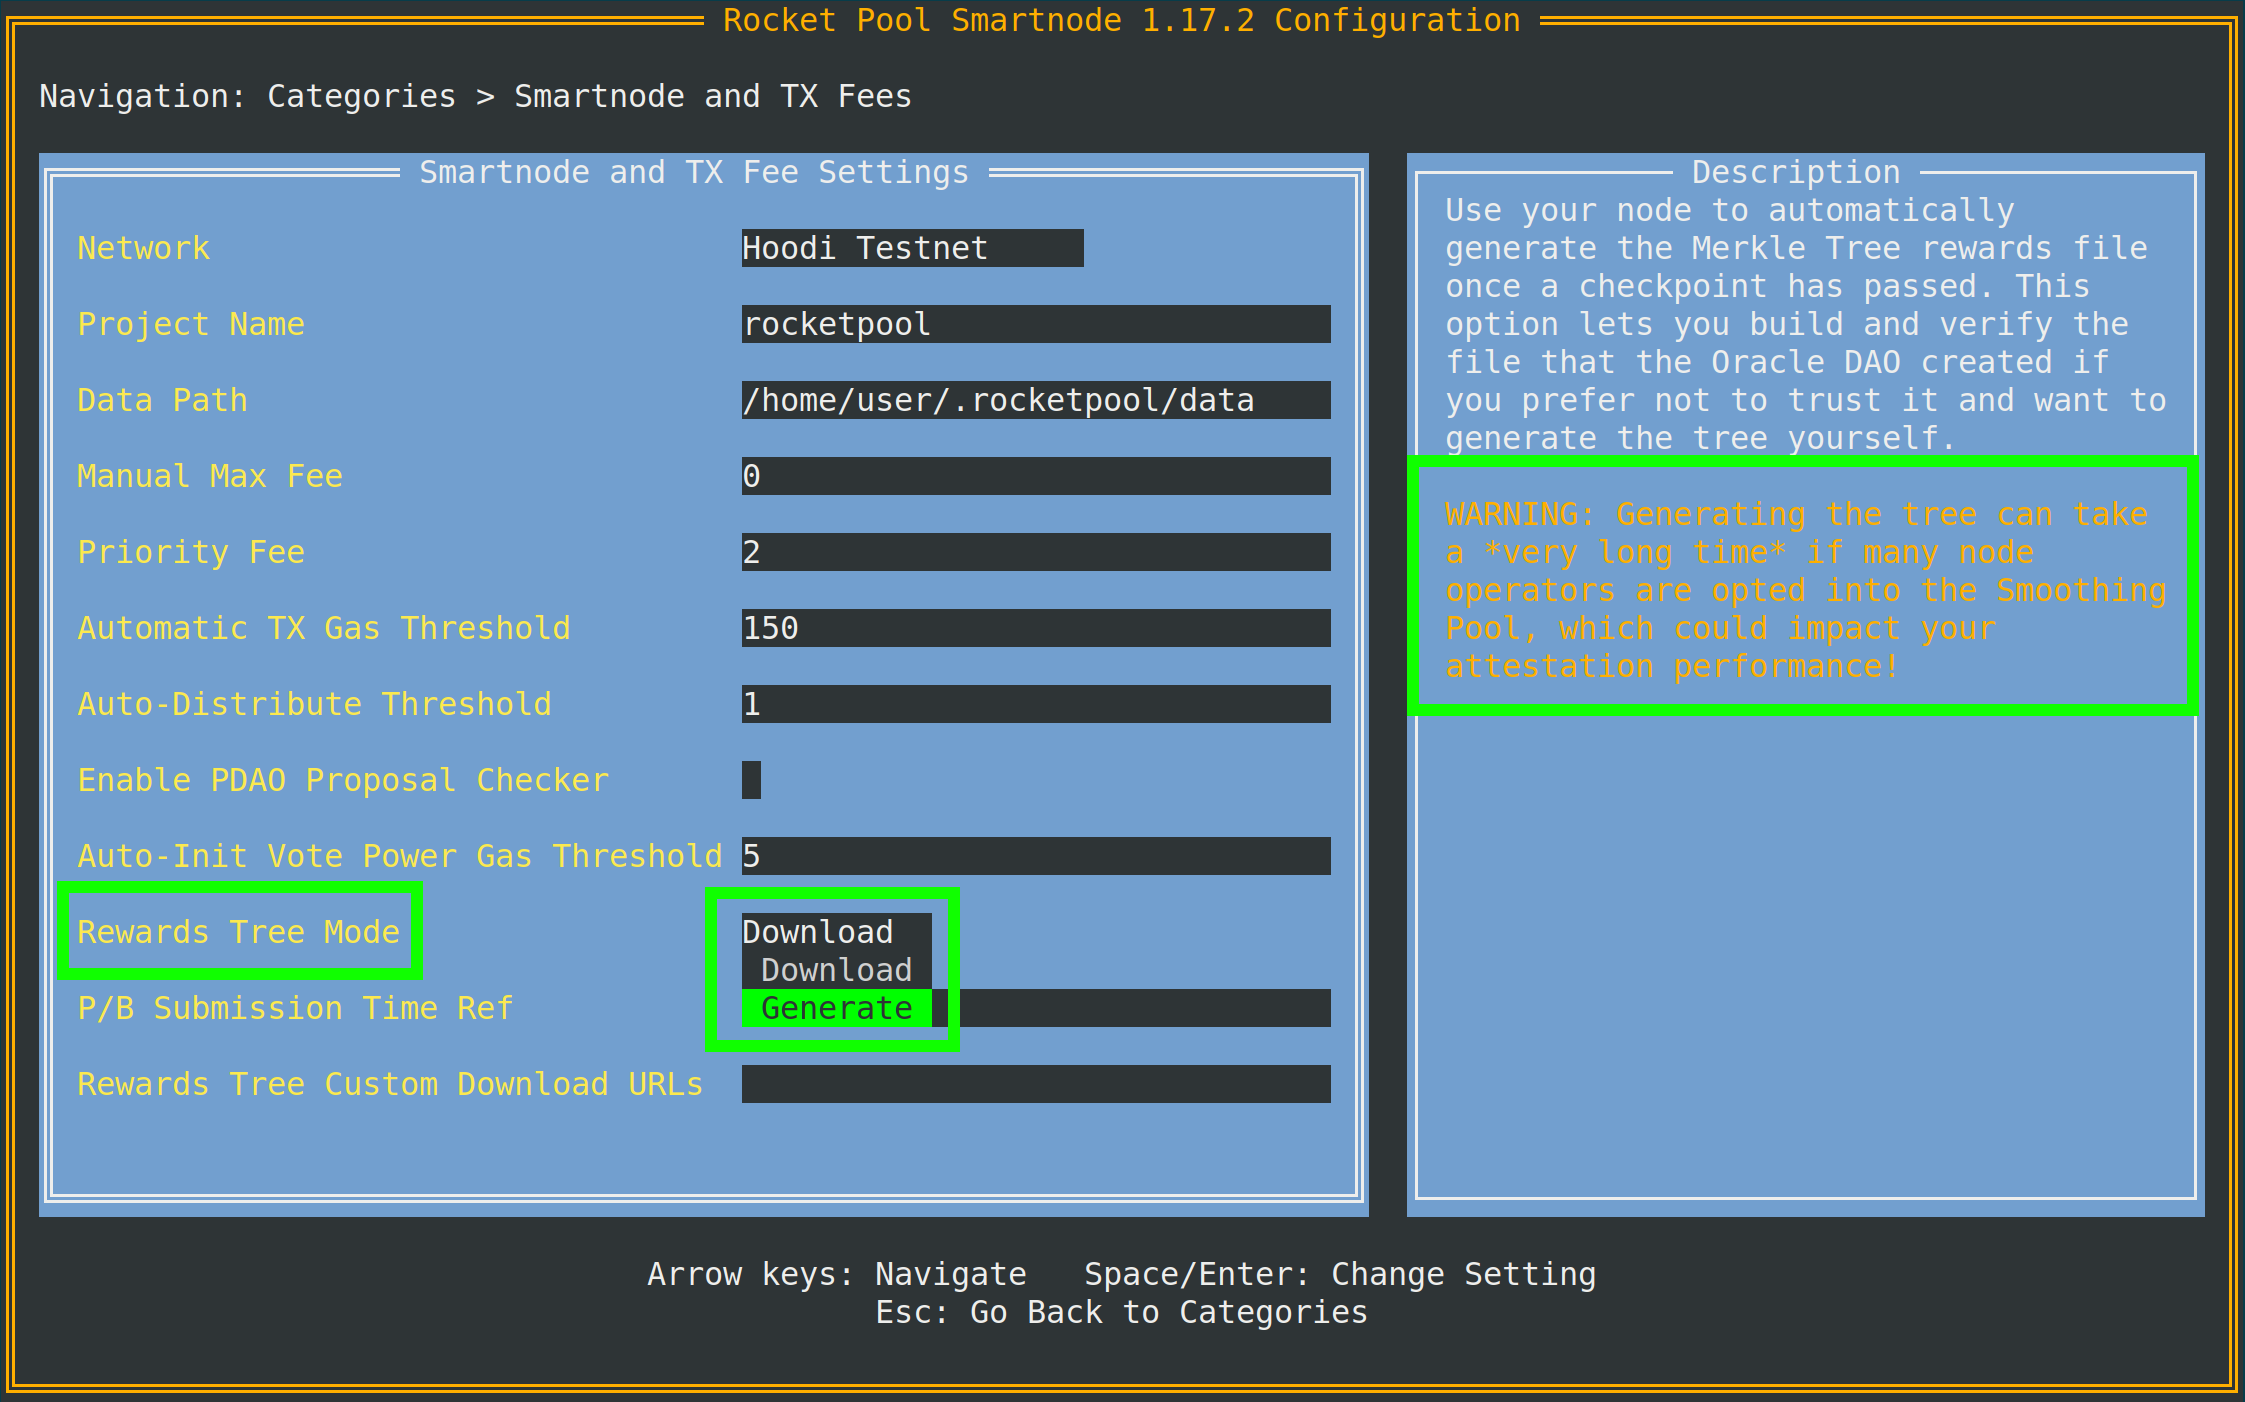
Come suggerisce il suggerimento, avrai bisogno di accesso a un nodo archivio del client Execution per farlo.
Se il tuo client Execution locale non è un nodo archivio, puoi specificarne uno separato (come Infura o Alchemy) nell'Archive-Mode EC URL più in basso nello stesso menu.
Questo URL verrà utilizzato solo quando si generano gli alberi Merkle; non verrà utilizzato per i compiti di validazione.
join-smoothing-pool
rocketpool node join-smoothing-pool
Questo ti registrerà come opt-in nei contratti Rocket Pool e cambierà automaticamente il fee recipient del tuo Validator Client dal contratto distributore del tuo nodo al contratto dello Smoothing Pool.
Nota che una volta che ti sei iscritto, c'è un cooldown di 28 giorni (un intervallo di ricompense completo) prima di poter rinunciare.
leave-smoothing-pool
rocketpool node leave-smoothing-pool
Questo ti farà uscire dallo Smoothing Pool se sei attualmente iscritto e hai aspettato almeno 28 giorni dopo l'iscrizione.
Una volta finalizzata l'epoca successiva all'epoca corrente, cambierà automaticamente il fee recipient del tuo nodo dallo Smoothing Pool al contratto distributore del tuo nodo.
Questo è per assicurarti di non essere penalizzato per anticipare il processo di uscita quando vedi che hai una proposta in arrivo.
distribute-fees
Una volta che hai guadagnato ricompense sul tuo fee distributor, puoi richiedere e distribuire l'intero saldo usando il seguente comando:
rocketpool node distribute-fees
Questo invierà la tua quota delle ricompense al tuo indirizzo di prelievo.
send
Questo comando ti permette di inviare ETH, RPL o altri token correlati a Rocket Pool dal wallet del nodo a un indirizzo diverso.
Questo potrebbe essere utile se vuoi spostare i tuoi fondi sul wallet altrove.
La sintassi per utilizzare il comando send è così:
rocketpool node send <amount> <token> <address or ENS name>
Gli argomenti sono i seguenti:
<amount> è la quantità del token da inviare.<token> è il token da inviare - questo può essere eth, rpl, fsrpl (il vecchio token RPL legacy), o reth.<address or ENS name> è l'indirizzo Ethereum (o nome ENS) a cui inviare i token.
Ad esempio:
rocketpool node send 1 eth <my friend's address>
invierebbe 1 ETH al mio amico.
Comandi Megapool
Il gruppo megapool è dove puoi accedere a tutti i comandi utilizzati per gestire il tuo megapool e i validator del megapool.
Ecco cosa mostrerà rocketpool megapool help:
NAME:
   rocketpool megapool - Manage the node's megapool

USAGE:
   rocketpool megapool [global options] command [command options] [arguments...]

VERSION:
   1.19.1

COMMANDS:
   deposit, d                Make a deposit and create a new validator on the megapool. Optionally specify count to make multiple deposits.
   status, s                 Get the node's megapool status
   validators, v             Get a list of the megapool's validators
   repay-debt, r             Repay megapool debt
   reduce-bond, e            Reduce the megapool bond
   claim, c                  Claim any megapool rewards that were distributed but not yet claimed
   stake, k                  Stake a megapool validator
   exit-queue, x             Exit the megapool queue
   dissolve-validator, i     Dissolve a megapool validator
   exit-validator, t         Request to exit a megapool validator
   notify-validator-exit, n  Notify that a validator exit is in progress
   notify-final-balance, f   Notify that a validator exit has completed and the final balance has been withdrawn
   distribute, b             Distribute any accrued execution layer rewards sent to this megapool

GLOBAL OPTIONS:
   --help, -h  show help
Di seguito è riportato un riepilogo dei comandi che utilizzerai tipicamente durante il normale funzionamento:
deposit
Questo comando ti permette di creare nuovi validator sul tuo megapool. Lo approfondiremo più avanti. Sentiti libero di saltare direttamente a Creazione di un Validator Megapool se vuoi un'anteprima.
status
Questo comando ti fornisce alcune informazioni sullo stato del tuo megapool e i validator gestiti dal tuo megapool. Potrai vedere l'indirizzo del tuo megapool, il numero di express queue ticket, l'indirizzo del delegate del megapool, il saldo ETH sull'execution layer e sul consensus layer, e molte altre informazioni utili. Ecco un esempio dell'output di rocketpool megapool status:
=== Megapool ===
The node has a megapool deployed at 0xCf3576c5A6e5a25AC00C9adb6751924BAe1680B1
The node has 0 express ticket(s).
The megapool has 9 validators.

=== Megapool Delegate ===
The megapool is using the latest delegate.
The megapool's effective delegate address is 0x138602A95956995280f1146aA9477d6B4E481B3c
The megapool has automatic delegate upgrades disabled. You can toggle this setting using 'rocketpool megapool set-use-latest-delegate'.

=== Megapool Balance ===
The megapool has 4.000000 node bonded ETH.
The megapool has 28.000000 RP ETH for a total of 32.000000 bonded ETH.
Megapool balance (EL): 32.051883 ETH
The megapool has 1 validators exiting. You'll be able to see claimable rewards once the exit process is completed.
Beacon balance (CL): 0.000000 ETH
Your portion: 0.000000 ETH
Current network commission: 5.000000%
validators
Il comando rocketpool megapool validators ti mostrerà lo stato di ciascun validator gestito dal megapool del tuo nodo. Potrai vedere informazioni come le pubkey dei validator, lo stato sulla beacon chain e la posizione in coda dei validator in prestaking:
There are 8 validator(s) on the express queue.
There are 2 validator(s) on the standard queue.
The express queue rate is 2.

1 Staking validator(s):

Megapool Validator ID:        1
Validator pubkey:             <pubkey>
Validator active:             no
Validator index:              <index>
Beacon status:                pending_queued
Express Ticket Used:          no


1 Initialized validator(s):

--------------------

Megapool Validator ID:        2
Expected pubkey:              <pubkey>
Validator active:             no
Validator Queue Position:     10
Express Ticket Used:          no


1 Exiting validator(s):

--------------------

Megapool Validator ID:        0
Validator pubkey:             <pubkey>
Validator active:             no
Validator index:              <index>
Beacon status:                withdrawal_done
Express Ticket Used:          yes
exit-validator
Questo comando ti permette di selezionare un validator da uscire volontariamente sulla Beacon Chain. Usalo quando vuoi chiudere un validator e prelevare il suo saldo ETH finale. Nota che questa operazione non può essere annullata - una volta attivata un'uscita, il validator si spegnerà permanentemente.
Comandi Minipool
Il gruppo minipool riguarda i comandi che influenzano i tuoi minipool.
Come per il gruppo node, li tratteremo più in dettaglio nella prossima sezione, ma potrebbe essere utile vederli tutti ora.
Ecco cosa mostrerà l'output di rocketpool minipool help:
NAME:
   rocketpool minipool - Manage the node's minipools

USAGE:
   rocketpool minipool command [command options] [arguments...]

COMMANDS:
   status, s                  Get a list of the node's minipools
   stake, t                   Stake a minipool after the scrub check, moving it from prelaunch to staking.
   set-withdrawal-creds, swc  Convert the withdrawal credentials for a migrated solo validator from the old 0x00 value to the minipool address. Required to complete the migration process.
   import-key, ik             Import the externally-derived key for a minipool that was previously a solo validator, so the Smart Node's VC manages it instead of your externally-managed VC.
   promote, p                 Promote a vacant minipool after the scrub check, completing a solo validator migration.
   refund, r                  Refund ETH belonging to the node from minipools
   begin-bond-reduction, bbr  Begins the ETH bond reduction process for a minipool, taking it from 16 ETH down to 8 ETH (begins conversion of a 16 ETH minipool to an LEB8)
   reduce-bond, rb            Manually completes the ETH bond reduction process for a minipool from 16 ETH down to 8 ETH once it is eligible. Please run `begin-bond-reduction` first to start this process.
   distribute-balance, d      Distribute a minipool's ETH balance between your withdrawal address and the rETH holders.
   exit, e                    Exit staking minipools from the beacon chain
   close, c                   Withdraw any remaining balance from a minipool and close it
   delegate-upgrade, u        Upgrade a minipool's delegate contract to the latest version
   find-vanity-address, v     Search for a custom vanity minipool address
   rescue-dissolved, rd       Manually deposit ETH into the Beacon deposit contract for a dissolved minipool, activating it on the Beacon Chain so it can be exited.

OPTIONS:
   --help, -h  show help
Di seguito è riportato un riepilogo dei comandi che utilizzerai tipicamente.
status
Questo comando fornisce semplicemente un riepilogo di ciascuno dei tuoi minipool.
Questo include il suo stato corrente, l'indirizzo eth1 del minipool, la commissione su di esso (chiamata node fee), la chiave pubblica del corrispondente validator ETH2 e alcune altre cose:
$ rocketpool minipool status

1 Staking minipool(s):

--------------------

Address:                <minipool eth1 address>
Penalties:             0
Status updated:        2025-07-15, 08:31 +0000 UTC
Node fee:              5.000000%
Node deposit:          8.000000 ETH
RP ETH assigned:       2025-07-14, 20:26 +0000 UTC
RP deposit:            24.000000 ETH
Minipool Balance (EL): 0.064202 ETH
Your portion:          0.018458 ETH
Available refund:      0.000000 ETH
Total EL rewards:      0.018458 ETH
Validator pubkey:      <validator eth2 address>
Validator index:       <validator eth2 index>
Validator active:      yes
Beacon balance (CL):   32.000347 ETH
Your portion:          8.000099 ETH
Use latest delegate:   no
Delegate address:      0x56903694d881282D33ed0643EAe14263880Dd47F
Rollback delegate:     <none>
Effective delegate:    0x56903694d881282D33ed0643EAe14263880Dd47F
refund
Questo comando ti permette di ritirare 16 ETH da un minipool se hai depositato 32 ETH per crearne uno, una volta che Rocket Pool è stato in grado di contribuire con 16 ETH dal pool di staking rETH.
exit
Questo comando invia un'uscita volontaria per il tuo validator sulla Beacon Chain.
Usalo quando vuoi chiudere un validator e prelevare il suo saldo ETH finale.
Nota che questo non può essere annullato - una volta attivata un'uscita, il validator si spegnerà permanentemente.
Flag Utili
Ci sono alcuni flag globali utili che puoi aggiungere ad alcuni dei comandi di cui sopra, che potresti voler sfruttare.
Impostazione di una Max Fee o Priority Fee Personalizzata (Prezzo del Gas)
A partire dal hardfork London di ETH1 nel luglio 2021, le transazioni Ethereum non usano più un singolo prezzo del gas per le loro transazioni.
Invece, le moderne transazioni Ethereum usano due valori:
- La max fee, che descrive il prezzo del gas massimo assoluto che sei disposto ad accettare su una transazione
- La max priority fee, che descrive l'importo massimo che sei disposto a "dare come mancia" al miner per includere la tua transazione in un blocco
SUGGERIMENTO
Il modo in cui questi due valori funzionano può essere un po' contorto, quindi ecco alcuni semplici esempi.
Diciamo che la tariffa di rete corrente, chiamata base fee, è a 50 gwei.
Invii una transazione con una max fee di 80 gwei e una priority fee di 2 gwei.
Poiché la base fee della rete è inferiore alla tua max fee, questa transazione potrebbe essere inclusa nel blocco corrente.
Ti costerebbe 50 gwei per la base fee e 2 gwei per la priority fee; anche se hai impostato la tua max fee a 80, ti costerebbe solo 52 gwei in totale.
Come altro esempio, diciamo che hai quella stessa transazione, ma ora la base fee della rete è 100 gwei.
Poiché 100 gwei è maggiore della tua max fee di 80 gwei, la tua transazione non sarà inclusa in questo blocco.
Invece, rimarrà semplicemente nel pool di transazioni fino a quando la base fee sarà abbastanza bassa da includerla.
Ora, diciamo che la base fee corrente è di nuovo 50 gwei e la tua transazione ha una max fee di 80 gwei e una priority fee di 4 gwei.
Verrebbe eseguita con un costo totale di 54 gwei.
La priority fee di 4 gwei assicurerebbe che fosse inclusa davanti a tutte le transazioni con una priority fee inferiore.
Se vuoi davvero che la transazione passi a tutti i costi, puoi impostare la priority fee uguale alla max fee.
Questo emula il comportamento del gas legacy, quindi la tua transazione userà tutto il gas che le dai - indipendentemente dal fatto che la base fee della rete sia inferiore alla tua max fee o meno.
Per impostazione predefinita, Rocket Pool utilizzerà un oracolo per guardare il pool di transazioni corrente e suggerire una max fee ragionevole per qualsiasi transazione che attivi.
Utilizza EtherChain per il suo oracolo di suggerimento primario e Etherscan come backup.
Se preferisci, puoi impostare una max fee personalizzata (in gwei) che saresti disposto a pagare con il flag -f.
Puoi anche impostare una priority fee personalizzata con il flag -i.
Per farlo, aggiungili dopo rocketpool e prima delle altre informazioni del comando.
Ad esempio, chiamare node set-timezone con questo flag fornirebbe il seguente output:
$ rocketpool -f 10 node set-timezone

Would you like to detect your timezone automatically? [y/n]
n

Please enter a timezone to register with in the format 'Country/City':
Australia/Brisbane

You have chosen to register with the timezone 'Australia/Brisbane', is this correct? [y/n]
y

Using the requested max fee of 10.00 gwei (including a max priority fee of 2.00 gwei).
Total cost: 0.0005 to 0.0007 ETH
Are you sure you want to set your timezone? [y/n]
Questo mostra che indipendentemente dalla max fee consigliata dalla rete, utilizzerà la tua max fee personalizzata di 10 gwei (e priority fee se la specifichi) invece quando invii questa transazione.
NOTA
Se imposti una max fee manuale, ti incoraggiamo vivamente a utilizzare un oracolo del prezzo del gas di terze parti come EtherChain per determinare se quella tariffa è sufficientemente alta per le condizioni di rete correnti prima di inviare la transazione.
Annullamento / Sovrascrittura di una Transazione Bloccata
A volte, potresti trovarti in uno scenario in cui hai inviato una transazione alla rete ma hai usato un prezzo del gas troppo basso per le condizioni di rete, e ci vorrà un tempo proibitivamente lungo per eseguirla.
Poiché tutte le tue transazioni successive aspetteranno fino a quando quella non viene eseguita, quella transazione blocca essenzialmente tutte le operazioni sul tuo nodo Rocket Pool.
Per affrontare questa situazione, abbiamo aggiunto un flag globale che ti permette di "annullare" tale transazione sostituendola con qualcos'altro.
Ogni wallet Ethereum, incluso il wallet del tuo nodo, invia transazioni in sequenza.
Ogni transazione che invii ha un numero chiamato nonce che identifica dove vive in quella sequenza.
La primissima transazione che invii avrà un nonce di 0, la successiva che invii avrà un nonce di 1, e così via.
Questa tecnica di sovrascrittura implica l'invio di una nuova transazione che utilizza lo stesso nonce della tua transazione bloccata esistente, ma idealmente includerà un prezzo del gas più alto rispetto a quella bloccata.
Questo significa che quella nuova verrà minata per prima.
Non appena viene minata in un blocco, quella vecchia verrà scartata dalla rete come se non fosse mai stata inviata.
Per utilizzare questo flag, devi prima trovare il nonce della tua transazione bloccata:
- Vai a un block explorer ETH1 come https://etherscan.io.
- Naviga all'indirizzo del tuo wallet e guarda l'elenco delle transazioni.
- Passale in rassegna, partendo dalla più recente, fino a trovare quella più in basso nella lista che ha lo stato
Pending.
- Segna il
nonce di quella transazione. È quello di cui avrai bisogno.
Una volta che ce l'hai, chiama semplicemente qualsiasi transazione con la CLI usando i flag --nonce <value> -i 2.2 dopo rocketpool e prima del resto del comando.
NOTA
Devi includere il flag -i (priority fee) per sovrascrivere una transazione precedente.
Questo numero deve essere almeno il 10% più alto di qualsiasi priority fee utilizzata dalla tua vecchia transazione.
Lo Smartnode usa una priority fee di 2 gwei per impostazione predefinita, quindi un valore di 2.2 è solitamente sufficiente per una sovrascrittura.
Se la tua vecchia transazione ha utilizzato una tariffa personalizzata (diciamo, 10 gwei), dovrai impostarla almeno il 10% più alta nella transazione di sovrascrittura (quindi in questo esempio, 11 gwei).
Ad esempio, diciamo che ho inviato una transazione con un nonce di 10 e una max fee di 20 gwei, ma la tariffa di rete corrente è 100 gwei, quindi la mia transazione è bloccata.
Per risolverlo, invierò una transazione in cui invio una piccola quantità di ETH da me stesso a me stesso con una max fee più alta (diciamo, 150 gwei) e una priority fee più alta.
Brucerò un po' di gas facendolo, ma sblocherà la transazione bloccata:
$ rocketpool --nonce 10 -f 150 -i 2.2 node send 0.0001 eth <node wallet address>

Using the requested max fee of 150.00 gwei (including a max priority fee of 2.20 gwei).
Total cost: 0.0032 to 0.0032 ETH
Are you sure you want to send 0.000100 eth to <node wallet address>? This action cannot be undone! [y/n]
Lo stack Smartnode controllerà automaticamente per assicurarsi che il nonce che hai fornito sia valido (si riferisce a una transazione in sospeso) prima di inviarlo e sprecare accidentalmente il tuo gas.
In caso contrario, restituirà un messaggio di errore.
Altrimenti, passerà e ti fornirà i dettagli della transazione così puoi monitorarla per confermare che ha, infatti, sovrascritto la tua vecchia transazione bloccata.
Questo è tutto per i comandi CLI comuni.
Nella prossima sezione, vedremo come creare un minipool e iniziare a validare sulla Beacon Chain.